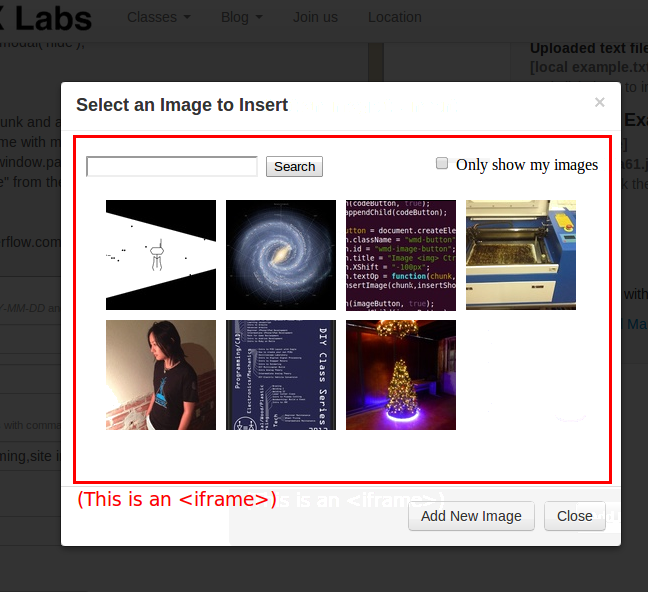
The new TX/RX blog site uses WMD editor, a what-you-see-is-what-you-mean markdown editor. You can use this to add any image, but we have our own image library that we want to pull in images from (so that we can re-use photos elsewhere on the site, coming soon!), so we needed to overwrite the image button. This technique could easily be used to add buttons.
Taking from this stackoverflow.com post, I located the code for the button in wmd.js:
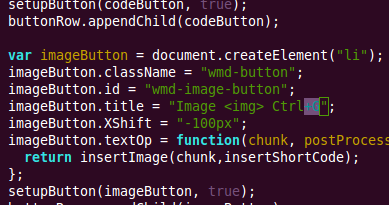
var imageButton = document.createElement("li");
imageButton.className = "wmd-button";
imageButton.id = "wmd-image-button";
imageButton.title = "Image <img> Ctrl+G";
imageButton.XShift = "-100px";
imageButton.textOp = function(chunk, postProcessing, useDefaultText){
  return insertImage(chunk,insertShortCode); // this line was changed
};
setupButton(imageButton, true);
buttonRow.appendChild(imageButton);
The only line changed is commented above (only editing one line allows for easy updating and less unforeseen errors). Rather than modifying the whole file I created a function insertImage that accepts wmd-editor's chunk as an argument and a callback function insertShortCode.
function insertImage(chunk,callback) {
  window.wmd_chunk = chunk;
  window.current_modal = "#image-modal";
  window.iframe_callback = callback;
  $("#image-modal iframe").attr("src","/insert_photo/");
  $("#image-modal").modal('show');
}
function insertShortCode(obj) {
  var out = wmd_chunk.before.trimRight()+"\n\n";
  out += obj.shortcode;
  out += "\n\n"+wmd_chunk.after.trimLeft();
  $("#wmd-input").val(out.trim());
  $(current_modal).modal('hide');
}
This stashes the chunk and a few other variables away for future use and then opens an iFrame with my image library. Clicking on an image in the iFrame then calls window.parent.iframe_callback(image_object), which gets the "short code" from the image objects, inserts it into the editor and closes the modal.